Conquer Your Spreadsheet: Obliterate Empty Excel Rows
Ever find yourself staring at a massive Excel spreadsheet, riddled with annoying gaps and empty rows? It's like navigating a minefield of data, making analysis a frustrating chore. Don't despair, because cleaning up those vacant rows is easier than you think. This guide will equip you with the tools and techniques you need to eliminate blank rows in Excel and transform your cluttered spreadsheet into a well-organized data haven.
Dealing with empty rows is a common Excel woe. They can crop up after importing data, deleting cells, or simply from imperfect data entry. These gaps disrupt data analysis, making it hard to sort, filter, and perform calculations effectively. They also bloat your file size, impacting Excel's performance, especially with large datasets.
While the concept of clearing empty rows seems simple, the "how-to" can vary based on your specific needs. From basic filtering to more sophisticated methods using VBA (Visual Basic for Applications), there's a method for everyone, regardless of your technical expertise. We'll explore these diverse approaches, providing clear explanations and real-world examples to help you choose the best strategy for your situation.
The ability to efficiently delete empty rows is a fundamental skill for any Excel user. Whether you're a financial analyst crunching numbers or a small business owner managing inventory, decluttering your spreadsheets will save you time and headaches. Imagine the satisfaction of a clean, organized dataset, ready for seamless analysis and reporting. It's like clearing the clutter from your desk – it just makes everything easier.
This isn't just about aesthetics; eliminating superfluous rows can significantly enhance Excel's performance, especially with larger files. Less data means faster processing times for calculations, sorting, and filtering. This translates to improved productivity, allowing you to focus on the actual analysis rather than waiting for your spreadsheet to load. So, let's dive in and learn how to banish those blank rows for good.
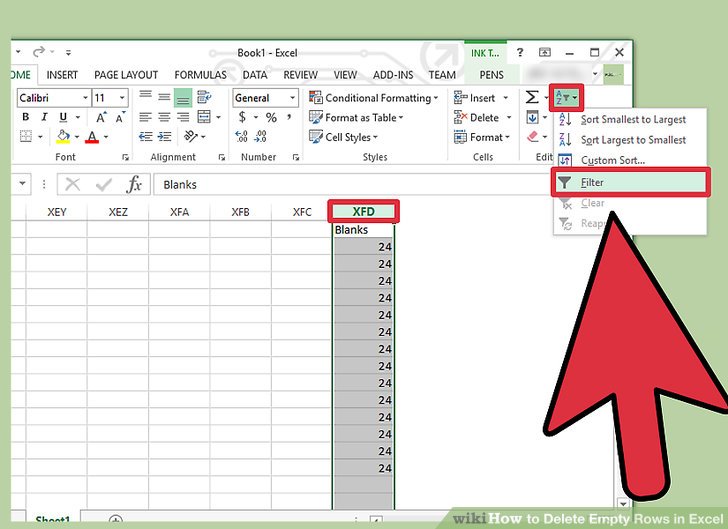
One simple method involves using filtering. Select the entire data range, go to the Data tab, and apply a filter. In the dropdown for any column, select "(Blanks)". This isolates all rows with blank cells in that column. You can then select these rows and delete them. However, be cautious – if a row has data in other columns, it will be deleted entirely.
Another approach utilizes the "Go To Special" feature. Select your data range, press F5, then click "Special." Choose "Blanks" and click "OK." This highlights all blank cells. On the Home tab, under "Delete," select "Delete Sheet Rows." This method is more targeted towards entirely empty rows.
For more advanced users, VBA offers powerful solutions. A simple macro can automatically detect and delete empty rows across an entire sheet or a specified range. While this requires some coding knowledge, it can automate the process, especially if you deal with this issue frequently.
Benefits of Removing Blank Rows:
1. Improved Data Analysis: Cleaner data leads to easier sorting, filtering, and calculation, resulting in more accurate and insightful analysis.
2. Enhanced Excel Performance: Smaller file sizes translate to faster processing times, especially with large datasets.
3. Professional Presentation: Clean, organized spreadsheets look more professional and are easier to share with colleagues and clients.
Step-by-Step Guide (Filtering Method):
1. Select the entire data range.
2. Go to the "Data" tab and click "Filter."
3. In any column's dropdown, select "(Blanks)."
4. Select the visible blank rows.
5. Right-click and choose "Delete Rows."
Advantages and Disadvantages of Removing Blank Rows
| Advantages | Disadvantages |
|---|---|
| Improved Data Analysis | Potential for accidental data deletion if not careful |
| Enhanced Excel Performance | Can be time-consuming for extremely large datasets with manual methods |
FAQ:
1. What if I accidentally delete data? Use Ctrl+Z to undo the action.
2. Can I delete blank rows in specific columns only? Yes, using the filtering method, apply filters to the desired columns.
... (Add more FAQs)
Conclusion: Learning to effectively remove blank rows from your Excel spreadsheets is a game-changer. It not only improves the visual appeal of your data but also enhances its functionality and the performance of Excel itself. By implementing the methods discussed in this guide, you can streamline your data analysis process and create cleaner, more professional spreadsheets. Take control of your data, ditch the clutter, and unleash the full potential of your Excel workbooks. Start cleaning those spreadsheets today!
Merge dragons merge dark grimm tree
Brazilian flag png images a comprehensive guide
The unraveling of belonging exploring denaturalization


