Excel Row Height: A Tailored Fit for Your Data
In the realm of spreadsheets, where data reigns supreme, there's a subtle art to presentation. Much like a perfectly tailored suit, the fit must be impeccable. And in Excel, achieving that perfect fit often comes down to mastering row height. An ill-fitting row can obscure vital information, making a spreadsheet feel cluttered and unprofessional. But a row height adapted precisely to its content? That's where elegance and efficiency meet.
Think of a crowded marketplace, stalls overflowing with goods. Without proper organization, it’s chaos. Similarly, in Excel, cramming data into rows that are too short creates a visual mess. Conversely, excessive space between lines leaves a spreadsheet feeling unnecessarily expansive, like an oversized garment. The goal is balance, a harmonious relationship between content and container.
Optimizing row height in Excel is more than just aesthetics. It's about clarity, about ensuring that every piece of data has the space it needs to breathe. It’s about transforming a dense block of information into a clear and easily digestible narrative.
The feature to modify row height has been a core component of Excel for decades, evolving alongside the software itself. From the early days of manually dragging row borders to the sophisticated auto-fit options available today, the functionality has always addressed the fundamental need for adaptable presentation in spreadsheets. This adaptability is crucial for accommodating the diverse range of data Excel handles, from concise text strings to complex formulas.
One of the primary challenges in managing row height is dealing with content that varies significantly in length. A single cell within a row might contain a short phrase, while another holds a lengthy paragraph. Finding the right balance that displays all information clearly can be tricky, particularly in large datasets. This is where the "auto-fit" feature truly shines, dynamically resizing rows to the optimal height based on their longest content.
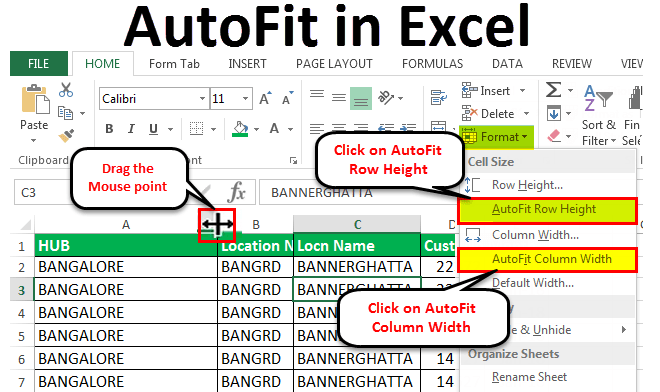
Auto-fitting rows involves selecting the rows you wish to modify and then choosing the "AutoFit Row Height" option. This automatically adjusts the height of each selected row to perfectly accommodate the largest content within that row. Alternatively, double-clicking the bottom border of a row header will also auto-fit that specific row.
Benefits of adjusting Excel row height include improved readability, enhanced aesthetics, and increased efficiency in navigating the spreadsheet. For instance, if a row contains wrapped text that is truncated, auto-fitting ensures the entire content is visible, improving readability. Aesthetically, uniformly sized rows create a cleaner and more professional look. And from an efficiency standpoint, clearly visible data reduces the time spent scrolling or expanding rows manually.
An effective action plan for managing row height includes assessing the type of content in your spreadsheet, choosing the appropriate adjustment method (manual or auto-fit), and regularly reviewing row heights as new data is added or modified. For example, when working with financial data, concise, uniformly sized rows are usually preferred. However, for a report containing detailed descriptions, auto-fitting ensures complete visibility of the textual content.
Advantages and Disadvantages of Auto-Fitting
| Advantages | Disadvantages |
|---|---|
| Saves time by automatically resizing rows. | Can sometimes create excessive white space if content length varies dramatically. |
| Ensures all content is visible. | Might not be suitable for spreadsheets with a strict row height requirement for printing purposes. |
Best practices include using auto-fit judiciously, considering manual adjustments for fine-tuning, and consistently applying the same row height settings across similar data sets for a cohesive look. Avoid excessively large row heights as this can lead to wasted space and make navigation more cumbersome.
Frequently asked questions include how to auto-fit multiple rows at once, how to reset row heights to a default value, and how to manually adjust row height for specific rows. The answers to these questions are readily available through Excel's help documentation and various online resources.
A simple trick for handling rows with varying content lengths is to merge cells containing shorter text strings, creating a visual balance that avoids excessive white space when auto-fitting. This combines the efficiency of auto-fitting with the precision of manual adjustments.
In conclusion, the seemingly mundane task of adjusting row height in Excel plays a vital role in transforming a simple grid of data into a polished and informative document. Much like the meticulous attention to detail that goes into creating a bespoke suit, the proper fitting of row heights brings order, clarity, and a touch of elegance to your spreadsheets. By mastering the techniques discussed, from leveraging the power of auto-fit to implementing best practices for manual adjustments, you can ensure that your data is presented with the clarity and professionalism it deserves. Take the time to tailor your spreadsheets, and you'll discover the transformative power of a perfect fit, elevating your work from merely functional to truly impressive. Don't just present your data, showcase it.
Sherwin williams captivate paint a fresh perspective
Score a sweet deal your guide to used rs3s near you
Welcoming your newborn baby boy a comprehensive guide


