Tame Your Spreadsheet Beast: Mastering Excel's Autofit, Wrap Text, and Row Height
Ever feel like your Excel spreadsheets are a chaotic mess of overflowing text and truncated data? You painstakingly enter information, only to find it hidden or spilling into neighboring cells, creating a visual nightmare. The solution? Mastering Excel’s dynamic duo: autofit row height and wrap text. These simple yet powerful features can transform your spreadsheets from cluttered chaos into organized masterpieces.
Imagine effortlessly resizing rows to perfectly accommodate your content, ensuring every word is visible and readable. With wrap text, long entries neatly flow within their designated cells, preventing overlap and maintaining a polished, professional appearance. This is the power of Excel's autofit row height and wrap text functionalities, and in this article, we'll delve deep into how to harness their full potential.
The combination of autofit row height and text wrapping has been a staple in Excel for years, evolving alongside the software itself. Its origins stem from the need to present data effectively within the confines of a spreadsheet. Before these features, users had to manually adjust row heights and column widths, a tedious and time-consuming process. Autofit and wrap text streamlined this process, making it significantly easier to manage and display information within spreadsheets.
These features are crucial for maintaining clarity and readability in spreadsheets. They eliminate the need for horizontal scrolling, ensuring all data is visible at a glance. They also prevent data truncation, ensuring that crucial information isn't hidden from view. This is especially important for reports, presentations, and data analysis where accurate and easily accessible information is paramount.
Despite their usefulness, some issues can arise when using these features. For example, if a row contains a very long string of text without any spaces, autofit row height might make the row excessively tall. Similarly, wrapping text can sometimes lead to awkward line breaks if not managed carefully. However, these challenges are easily addressed with the tips and tricks we'll cover later.
Autofitting row height automatically adjusts the height of a row to fit the tallest cell within that row. Wrapping text ensures that all text within a cell is visible by wrapping it onto multiple lines within the cell boundaries. For instance, if you have a cell containing "This is a long sentence," and the cell isn't wide enough to display the entire sentence on one line, wrap text will break the sentence into multiple lines within the same cell.
Benefits of Using Autofit Row Height and Wrap Text:
1. Enhanced Readability: No more squinting or scrolling to decipher hidden text. Everything is clearly displayed, making it easy to understand the data at a glance. Example: A product description with multiple features is fully visible within its designated cell, improving readability for inventory management.
2. Improved Aesthetics: Say goodbye to overflowing text and messy spreadsheets. Autofit and wrap text create a clean and professional look, enhancing the overall presentation of your data. Example: A sales report with neatly formatted data presents a more professional image to stakeholders.
3. Increased Efficiency: Save time and effort by automating the formatting process. No more manual adjustments! Example: When importing large datasets, autofit and wrap text quickly format the data, saving significant time.
Step-by-Step Guide:
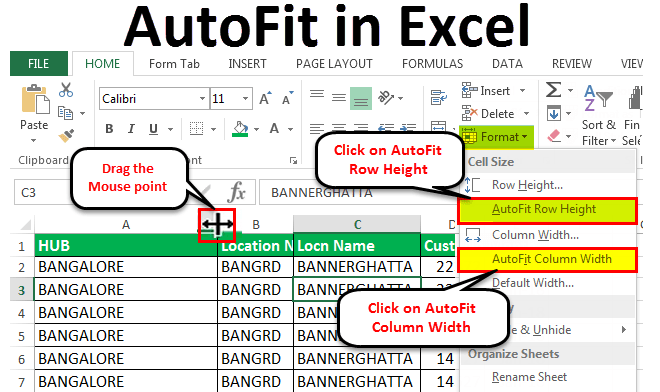
1. Select the rows you want to autofit.
2. Go to the "Home" tab on the ribbon.
3. In the "Cells" group, click "Format".
4. Under "Cell Size," click "AutoFit Row Height".
5. To wrap text, select the cells you want to format.
6. In the "Alignment" group on the "Home" tab, click "Wrap Text".
Advantages and Disadvantages
| Advantages | Disadvantages |
|---|---|
| Improved readability | Potential for excessively tall rows with long unbroken text strings |
| Enhanced aesthetics | Possible awkward line breaks with wrap text |
| Increased efficiency | May require manual adjustments in specific cases |
Best Practices:
1. Use Alt + H + O + A as a shortcut for autofitting row height.
2. Use Alt + H + W as a shortcut for wrapping text.
3. Adjust column widths in conjunction with autofit row height and wrap text for optimal display.
4. Be mindful of long text strings without spaces; consider adding spaces or manual breaks to prevent excessively tall rows.
5. Preview your spreadsheet after applying autofit and wrap text to ensure the desired formatting.
FAQ:
1. What is autofit row height? - Automatically adjusts the height of a row to fit the tallest cell content.
2. What is wrap text? - Wraps text within a cell onto multiple lines.
3. How do I autofit row height? - Select rows, go to Home > Format > AutoFit Row Height.
4. How do I wrap text? - Select cells, go to Home > Alignment > Wrap Text.
5. Can I autofit row height and wrap text simultaneously? - Yes, apply both features separately to the selected cells.
6. Why is my row excessively tall after autofitting? - Likely due to a long unbroken text string. Add spaces or manual breaks.
7. How do I prevent awkward line breaks with wrap text? - Adjust column width or manually insert line breaks.
8. What's the shortcut for autofitting row height? - Alt + H + O + A.
In conclusion, mastering Excel's autofit row height and wrap text features is essential for creating clear, professional, and easy-to-read spreadsheets. These functionalities not only enhance the visual appeal of your data but also improve efficiency by automating the formatting process. By understanding the nuances of these features and implementing the best practices outlined in this article, you can conquer spreadsheet chaos and present your data with clarity and confidence. So, embrace the power of autofit row height and wrap text, and transform your spreadsheets from messy data dumps into powerful tools for analysis and communication. Start optimizing your spreadsheets today and experience the difference these simple yet impactful features can make.
Delhi moonrise time today mystique
Navigating nfl week 16 predictions from espn experts
Unlock stillwater living rental apartments guide


